In this article, I’ll walk you through six free mixing plugins that are worth keeping in your folder.
Mixing pulls a lot of different tools together, from compression and EQ to delay, reverb, and finishing effects, and finding free plugins that genuinely hold their own makes a real difference. Some focus on clean, transparent processing, while others lean into character, glue, or quick polish for fast finishing work.
I’ve tested plenty of free mixing plugins over the years, and the ones on this list are the tools I keep reaching for because they sound good, behave predictably, and handle real mixing tasks without feeling cheap or stripped down.
This isn’t a list of every freebie I’ve ever downloaded. It’s a focused set of plugins that cover compression, clipping, delay, reverb, and finishing polish, which is most of what a producer needs to mix a track without paying for premium bundles.
Whether you’re working in Ableton, FL Studio, Logic, or anything else, these should all fit naturally into your everyday mixing chain. Let’s get into it.
1. Venn Audio Free Clip 2
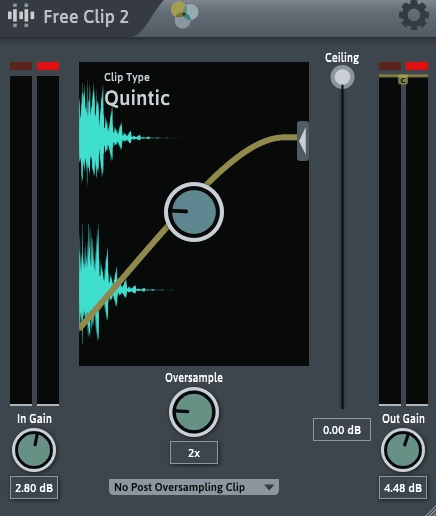
A clipper might not be the first plugin most producers reach for, but Free Clip 2 has earned a real spot in modern mixing workflows.
What stands out about Venn Audio’s plugin is how clean it sounds when shaving peaks. Clippers can be used to gain extra loudness or to control transients before a limiter or compressor, and Free Clip 2 handles both of those jobs without obvious harshness.
The plugin is simple enough that you’ll figure out the workflow in seconds, but it’s good enough to use on serious mix work. For producers exploring more modern, loudness-focused mixing techniques, this is a strong free pick to have around.
- Clean Clipping Behavior
The clipping behavior is clean and predictable, with adjustable hardness that ranges from gentle soft clipping to harder peak control. You can use it to shave transient peaks before a compressor or limiter without obvious distortion.
I find this useful on drum buses and master chains, where catching peaks before further processing helps everything else behave more musically.
- Adjustable Threshold
The threshold control lets you dial in exactly how much clipping happens. Lower thresholds catch more peaks, while higher thresholds keep things barely touched.
For modern loudness-focused mixing, having this kind of fine control means you can tailor how aggressive the clipping feels to fit different genres and tracks.
- Simple Workflow
The interface is minimal and focused, which makes it quick to drop in and adjust on the fly. There’s no learning curve, and the visual feedback is clear enough that you can see exactly what’s happening to your peaks.
I appreciate that nothing gets in the way during a mixing session, since clipper decisions usually need to happen fast. Free Clip 2 is a practical free clipper that fits naturally into modern mixing chains, and it’s worth keeping around for transient control and gentle loudness gain.
Free Clip 2 comes in VST and AU formats for macOS and Windows users.
2. Analog Obsession BUSTERse
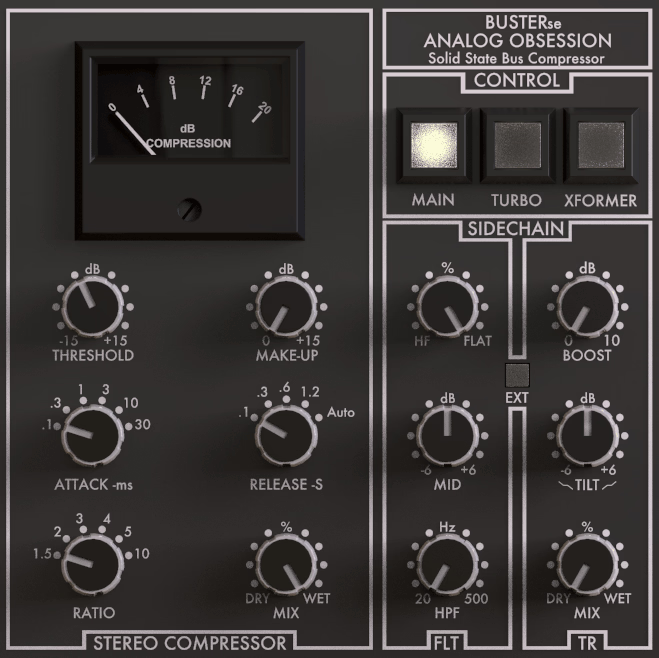
Bus compression is one of the most common moves in modern mixing, and BUSTERse handles it really well for a free plugin. Modeled after the classic SSL-style bus compressor, this plugin gives you that VCA-style glue that producers usually pay for.
It works equally well on drum buses, vocal groups, full mix buses, and even occasional master duties when you don’t want to load a dedicated mastering compressor.
The interface stays close to the original SSL hardware feel, but the added transient controls and Turbo mode push it into more flexible territory. For producers building a free mixing chain, this is one of the more useful compressors out there.
- Compression Controls
The standard attack, release, ratio, threshold, and makeup gain layout behaves predictably and feels musical across most settings. Setting up gentle bus glue or harder drum compression both happen quickly without much fiddling.
The compression curve feels forward and glued, which is exactly what bus compression should do without flattening individual elements.
- Dry/Wet Mix
The built-in mix knob opens up parallel-style compression without setting up extra routing. I usually blend somewhere around 50 to 70 percent for that mix of punch and dynamics.
It saves a lot of time compared to building dedicated parallel buses in your DAW, and the result usually feels just as good.
- Sidechain Options
The internal sidechain with high-pass filter prevents low-end energy from triggering the compressor too aggressively. Setting the high-pass between 80 and 120 Hz keeps drum buses behaving naturally without the kick over-pumping the rest of the kit.
I lean on this constantly when running heavy electronic drum buses through compression, since the kick can otherwise dominate the entire response.
- Turbo Mode
Turbo applies compression across the full frequency spectrum rather than the standard VCA behavior, which gives a more aggressive, hardware-like feel. It pushes signals forward in a way that feels closer to actual analog hardware than typical SSL clones.
When I want a busier drum group to feel more energetic, this mode adds a bit of bite without making things sound squashed.
- Xformer Mode And Transient Controls
The transformer emulation adds subtle low-mid weight, which helps glue stacked layers together more musically. The added transient shaping controls let you sharpen or soften attacks going into the compressor.
This combination is what makes BUSTERse feel like a hybrid plugin rather than a basic SSL clone, and the extra control comes in handy on snappy drum buses or busy mix groups. BUSTERse has earned a permanent place in my mixing template, and it’s one of the best free bus compressors available right now for everyday mixing.
Definitely check out other Analog Obsession plugins as they are literally born for mixing.
BUSTERse comes in VST2, VST3, AU, and AAX formats for macOS and Windows users.
3. Xfer OTT
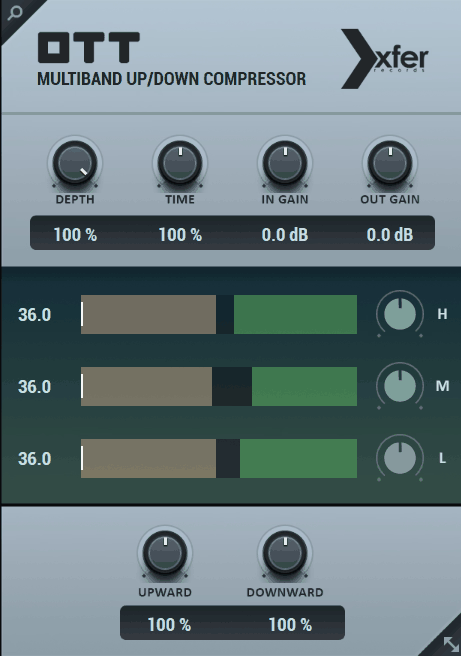
You’ve probably heard about OTT before, since it’s become a staple in modern electronic mixing for good reason. Xfer OTT splits incoming audio into three frequency bands and applies upward and downward compression to each one at the same time, which creates that signature inflated, energetic sound used heavily across EDM, dubstep, future bass, and modern pop production.
It’s not a subtle tool, and that’s the point. When you want a synth, bass, or drum loop to feel bigger, brighter, and more present without doing a ton of EQ work, OTT often gets you there in a few seconds.
- Multiband Compression
The plugin runs three frequency bands through both upward and downward compression simultaneously. This pulls quiet details forward while keeping peaks under control, which creates that recognizable “inflated” sound.
I reach for this constantly on EDM bass design, where I want every layer of the sound to come forward without the peaks running wild.
- Threshold And Output Controls
Each band has its own upper and lower thresholds plus level control, which gives you precise shaping for individual frequency ranges. Boosting the high band slightly is a quick way to add shine to leads and pads without adding an EQ.
This kind of band-by-band setup turns OTT into more than just an aggressive multiband compressor, since you can balance each range independently.
- Depth Control
The Depth knob acts as a dry/wet mix, which is helpful when you want a more controlled version of the OTT sound. Lower depth values keep things mix-friendly, while higher values lean into that signature “in your face” character.
I tend to keep depth high on bass design and lower it on more delicate sources like pads or vocals.
- Time Controls
The attack and release controls shape how aggressive or relaxed the compression feels. Faster times work great for snappy drums, while slower times suit pads and atmospheric sounds.
Having this kind of timing flexibility means OTT isn’t locked into one specific use case, since you can tune the compression to match different sources.
- Band Display
The visual display shows compressed and uncompressed signal levels side by side, which makes setting thresholds much easier. I use it when I want a more controlled version of the effect rather than the typical extreme settings.
For producers learning multiband compression, this kind of visual feedback is genuinely educational. OTT remains a go-to tool for electronic producers who want energy and aggression in their mixes, and it’s worth grabbing even if you only pull it up occasionally.
OTT comes in AU, VST, VST3, and AAX formats for macOS and Windows users.
4. Sixth Sample & Integraudio Deelay
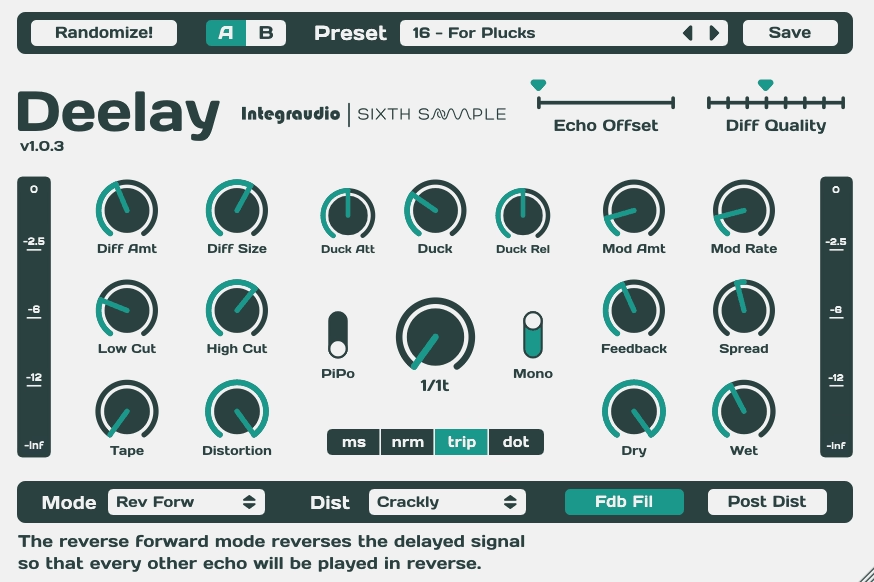
Every mixing setup needs a good delay, and Deelay quietly delivers more than you’d expect from a free plugin. The sound quality is what stands out first. Deelay handles slap delays, ambient tails, and rhythmic delays with a musical character that doesn’t feel flat or overly digital.
The modulation options also add subtle warmth that helps the delay sit naturally in busy mixes.
The plugin balances simplicity and depth in a way that’s rare for free delays. You won’t get lost in menus, but the controls go further than the basics when you need them to.
- Sync And Free Modes
You can switch between tempo-synced and free-running delay modes, which covers most musical situations. Sync mode locks tightly to your DAW for rhythmic delays, while free mode opens up unusual times for ambient or experimental textures.
The transition between modes is smooth without any glitches or sudden value jumps, which keeps the workflow stable.
- Modulation Section
The built-in modulation adds a subtle chorus-like quality to the delay tail, which makes the delay feel alive rather than mechanical. The depth and rate controls dial in everything from gentle wobble to more obvious warble.
I tend to use a touch of modulation on vocal delays for that polished, warm shimmer that’s hard to nail without it.
- Tone Shaping
The filter and tone controls shape the wet signal so it sits behind the dry source rather than fighting it. Rolling off some highs and lows on the wet signal is a classic move, and Deelay makes it easy to do without an extra EQ.
The filter sounds smooth and musical, never harsh, which keeps the delay feeling natural in any mix context.
- Stereo Controls
The stereo width and ping-pong options open up the delay tail across the stereo field. The ping-pong feels balanced rather than gimmicky, which is rare in free delays.
The width control lets you fine-tune how wide the delay spreads, giving you genuine flexibility for shaping space in a mix. Deelay is a quietly excellent free delay that handles everyday mixing tasks while still offering enough depth for creative work.
Deelay comes in VST, VST3, and AU formats for macOS and Windows users.
5. Slate Digital Fresh Air
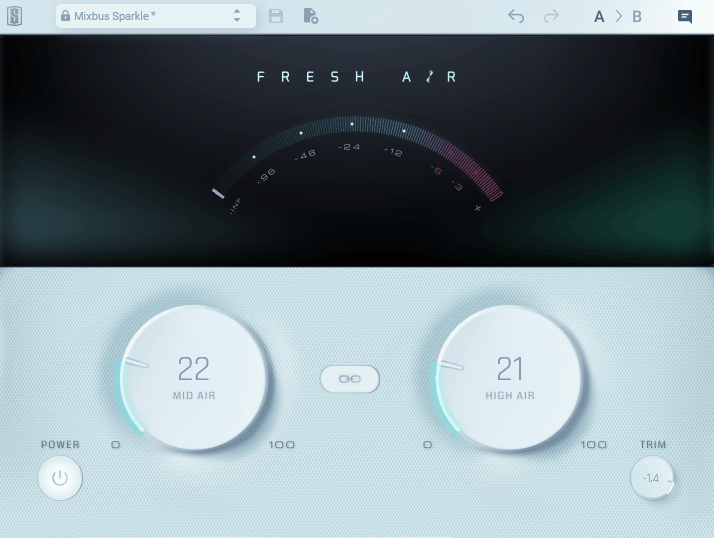
Adding clarity and air to a mix is one of the most common finishing moves, and Fresh Air does it with almost no effort. This is essentially a two-knob high-frequency enhancer that lifts presence and shimmer in a way that feels more polished than basic EQ work. It works on vocals, hi-hats, lead synths, and master buses with consistent results, which is why it’s earned a place in so many producers’ templates.
The simplicity is the strength here. There’s no learning curve, no menus to navigate, just two knobs that genuinely make tracks sound more open and modern when used carefully.
- Mid Air Knob
The Mid Air control adds presence in the upper-midrange, which lifts vocals and lead instruments forward without making them harsh. It’s especially useful when a vocal feels buried and you don’t want to keep stacking EQ moves.
The processing feels musical rather than surgical, so it adds clarity without making sibilants worse or pushing things into harshness.
- High Air Knob
The High Air knob delivers that glossy, modern shimmer at the top end. It’s tuned in a way that rarely creates problems, even when used on master buses or full mixes.
I lean on this knob a lot for hi-hats and cymbals, since it adds sparkle without grabbing a separate exciter or doing detailed high-shelf work.
- Set And Forget Workflow
Two knobs means you can’t really overthink anything, which keeps you focused on the music rather than the plugin. Decisions happen quickly, which matters when you’re deep in a mix and tired.
I appreciate this kind of design for finishing tasks, since stacking complex tools at the end of a chain often slows things down.
- Versatile Application
What I like most about Fresh Air is how it works on almost any source. From vocals and acoustic guitars to drum buses and master chains, there’s no real wrong place to use it, which makes it one of the more flexible free plugins around.
For producers building a lean mixing template, this kind of utility earns the plugin a permanent slot. Fresh Air is a practical finishing plugin that delivers polish without much work, and it’s earned its place across most of my mixing chains.
Fresh Air comes in VST, VST3, AU, and AAX formats for macOS and Windows users.
6. Variety Of Sound epicPLATE mkII
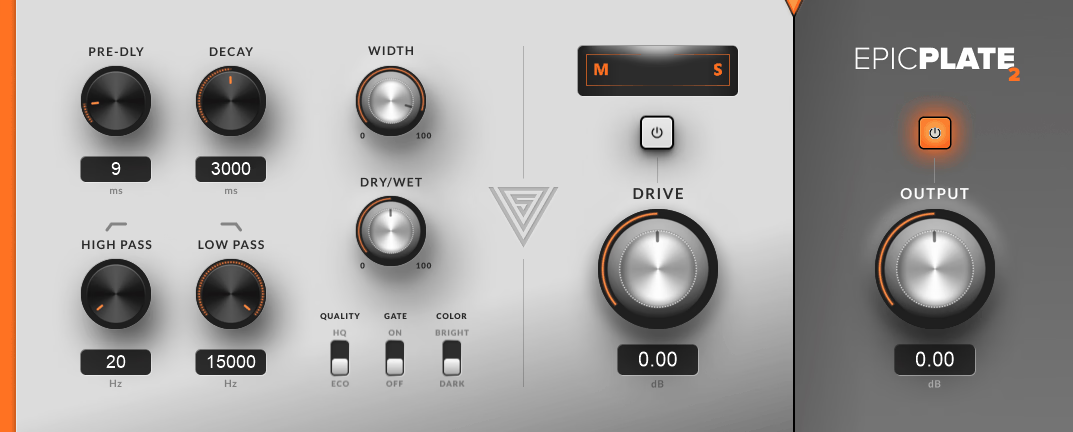
Closing out the list, epicPLATE mkII is the older but still excellent plate reverb emulation from Variety Of Sound.
Plate reverbs are a classic mixing tool, especially on vocals, snares, and synth leads, and epicPLATE mkII captures that dense, slightly metallic plate character that helps tracks feel polished and forward. The interface looks dated, but the sound holds up well next to plenty of paid options.
It’s the kind of plugin that proves you don’t always need the newest version of something to get great results in a mix. Mark II might be older, but it still earns its keep in modern sessions.
- Plate Algorithm Quality
The plate algorithm sounds rich and musical, with the smooth diffusion you’d expect from real plate reverbs. Vocals get that vintage, polished sheen, and snare drums benefit from extra size and presence.
The plate tone feels musical even at longer decay times, which means you can use it for both subtle ambience and more obvious vocal effects without things turning muddy.
- Tone Shaping Controls
The built-in damping and EQ controls shape the reverb’s brightness and weight quickly. Rolling off some lows keeps the reverb from clashing with the kick and bass in busy mixes.
High-frequency damping helps the reverb sit politely behind the dry signal rather than fighting it, which is huge for keeping clarity in dense arrangements.
- Stereo Width
The stereo width control opens up the reverb tail without losing focus or smearing the source. You can move from a tighter mono-style plate to a wider, more immersive sound with one knob.
For producers who like wide, modern reverbs, this control gives you flexibility, and it pairs especially well with vocals and lead instruments. epicPLATE is a timeless plate reverb that still earns a place in modern mixing setups, and it’s a great free pickup if you don’t already have a dedicated plate plugin.
It comes in VST format for Windows users.
Last Words
Free mixing plugins have come a long way, and the six on this list cover most of the essential mixing tasks without spending a cent.
Try a few of them on actual mixes to see how they fit your workflow, since the right tool often comes down to feel and use case rather than just features. Even one strong addition to your template can change how you mix.
I created VST Plugin News to share the latest updates on top-quality plugins with you. Most plugins featured here offer trial versions, and when you buy through retailers like PluginBoutique, Native Instruments, or Plugin Alliance, you help keep this site running through commissions without paying anything extra.
I only showcase plugins I actually use or would genuinely choose for my own work. Price tags don’t influence my recommendations. If I love a plugin, I’ll feature it regardless of cost. For pricier options, I always suggest trying the demo first when possible. Trial versions typically include full functionality, giving you a complete experience before committing. I hope my content proves valuable for your needs. Thanks for stopping by.